![]()
![]()
![]()
![]()
![]()
![]()
Materials
Outside Materials
Lab
Materials
Garden shovel(s)
10ml serological pipettes
Transect Sq. (0.5meters x
0.5meters)
3M Petrifilm Bacteria Growth Plates
Centimeters/Inches Ruler
15ml Culture tubes with caps
Small Tub
A 1- cc scoop
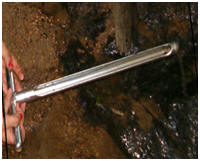
Soil Core Sampler(s)
Distilled Water
Plastic Sandwich Bags (3+)
Empty Petri Dishes
Garden Gloves (optional
{recommended}
Disposable dropper or pipettes
Hammer (optional {recommended})
P200 micro-pipette with tips
Lab Note book
Soil Core Samplers
Pencil/Pen
Magnifying Glasses
Bug Spray (optional {recommended})
Outsides Procedures


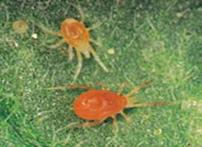
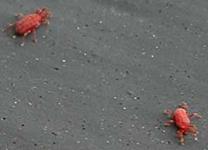
**Areas to search: Places
with a large # in Mite Population**
1.
Collect all outside materials and place into the
small tub.
2.
Choose a small area that you wish to investigate.
3.
Place the transect square on the exact spot that
you are investigating.
4.
With a soil core sampler, take 3 samples of soil
that are 15cm deep by 2 cm in width in different sections of the
transect sq.
5.
Place each sample into separate plastic bags that
should be labeled A, B, and C. Place samples to the side. (These samples
are going to be later tested.).
6.
After taking all three soil samples and placing
them off to the side, take a shovel and began to excavate (dig) through
the area. While excavating your area, search for mites.*
7.
The place you are excavating through shall be
15cm deep and 0.5x0.5meters wide.
8.
Keep track of the # of mites that may be found in
your lab note book.
9.
Repeat steps 1- 7 if needed for another area you
wish to investigate to compare results with.
* Important Note: Wear gloves, there are other bugs than just mite
Lab Procedures
**Place on safety goggles, gloves, and collect
all materials. Double check to for any cracks or breaks in glass or
plastic materials.
Serial Dilutions for Bacteria


1.
Use a clean new
transfer pipette to add 10 ml to a 15 ml culture tube. Label the tube
“100 “.
2.
Use the same pipette to
add 9ml to a second 15ml culture tubes. Label the tube “10-1
“.
3.
Repeat step 2 three
more times to three additional 15ml culture tubes, only label them “10-2”,
“10-3”, and “10-4” respectively.
4.
Place 1 cc of your soil
sample into the “100 “culture tube.
5.
Cap the tube and shake
vigorously.
6.
Using a new clean
pipette, remove 1 ml of the soil/ water mixture from the “100”
tube and place into the “10-1” tube.
7.
Cap and shake
vigorously.
8.
Using the same pipette
in step 5, remove 1 ml of soil/ water mixture from the “10-1”
tube and place into “10-2” tube.
9.
Cap and shake
vigorously.
10.
Using
the same pipette in step 5, remove 1ml of the soil/ water mixture from
the “10-2” tube and place into the “10-3” tube.
11.
Cap
and shake vigorously.
12.
Using
the same pipette in step 5, remove 1 ml of the soil/ water mixture from
the “10-3” tube and place into the “10-4” tube.
13.
You should now have a
total of five cultural tubes.
14.
Plat
100µl samples from the 4th and 5th tubes
(dilutions 10-3 & 10-4) onto their own separate,
labeled petri plates containing nutrient agar (NOTE: on your first
sample, plate all 5 dilutions to determine which two dilution values
will give you the best data; dilutions 10-3& 10-4
are only the most probable ones).
15.
Allow
to grow for 48 to 72 hours.
16.
Examine
each of the plates for individual bacteria colonies and choose the plate
with the fewest colonies (but at least 5) to make your estimates of the
number of bacteria in the original 1 cc soil sample using the following
formula:
#
Microbes in 1cc of soil = Colonies in sheet x 10-2x10 I
dilution # at which these colonies were found I
17.
If
there are not individual colonies but still a “lawn” at the 10-4
dilution, repeat the dilution adding a 5th (10-5)
& 6 (10-6) dilutions, etc. as necessary until individual
colonies are observed.
**Normal to have amounts
of bacteria high than 100 and lower than 5. No mistakes it either there
are low/ high populations of mites. **